These gluten free lemon bars are the perfect balance of buttery crust and bright, tangy lemon filling. They’re surprisingly easy to make and require just a handful of simple ingredients you probably already have in your pantry. Whether you’re baking for a family gathering, a potluck or just craving something sweet and citrusy, this recipe delivers every single time.
This recipe is perfect for busy home bakers, parents looking for a crowd-pleasing dessert, and anyone following a gluten-free diet. The bars are sweet, zesty, and have that classic lemon bar texture everyone loves. Plus, they’re made without any complicated techniques or hard-to-find ingredients.
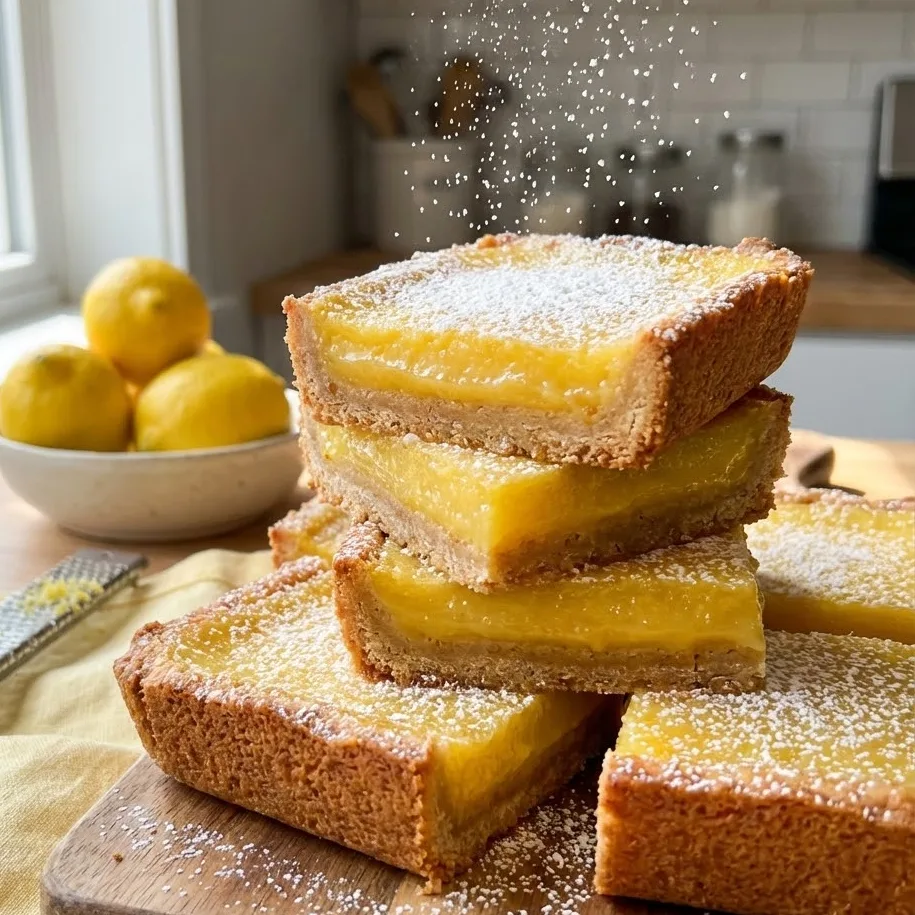
Table of Contents
Tested & Approved
Every recipe concept that earns our Tested & Approved badge goes through a rigorous evaluation against the Roz Recipes standard. We carefully analyze the ingredient synergy, verify the nutritional balance, and ensure the methodology is optimized for quick, everyday cooking. This specific combination is approved because its flavor profile is structurally sound, offering a perfect balance of taste, texture, and visual appeal designed to succeed in any home kitchen.
Quick Recipe Overview
Prep Time: 15 minutes
Cook Time: 45 minutes
Total Time: 60 minutes (plus cooling time)
Yield: 16 bars
Difficulty: Easy
gluten free lemon bars Ingredients
For the Crust:
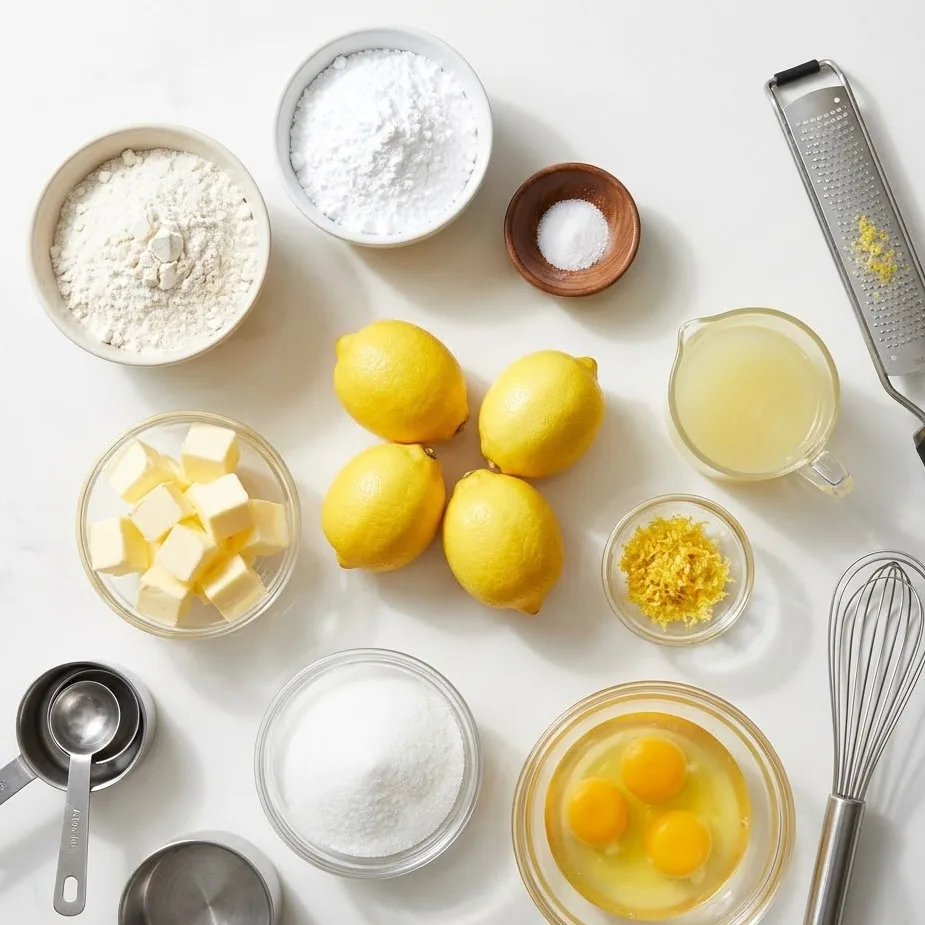
- 1 ½ cups gluten-free all-purpose flour blend (with xanthan gum)
- ½ cup powdered sugar
- ¼ teaspoon salt
- ¾ cup unsalted butter, cold and cubed
For the Lemon Filling:
- 4 large eggs
- 1 ½ cups granulated sugar
- ⅓ cup gluten-free all-purpose flour blend
- ½ cup fresh lemon juice (about 3-4 lemons)
- 1 tablespoon lemon zest
- ¼ teaspoon salt
For Topping:
- Powdered sugar for dusting
Instructions
Step 1: Prepare the Pan
Preheat your oven to 350°F (175°C). Line a 9×9-inch baking pan with parchment paper, leaving some overhang on the sides for easy removal later. Lightly grease the parchment with butter or cooking spray.
Step 2: Make the Crust
In a large mixing bowl, whisk together the gluten-free flour, powdered sugar, and salt. Add the cold cubed butter and use a pastry cutter or your fingers to work it into the flour mixture until it resembles coarse crumbs. Press the mixture evenly into the bottom of your prepared pan.
Step 3: Bake the Crust
Bake the crust for 18-20 minutes, or until it’s lightly golden around the edges. Remove from the oven and let it cool slightly while you prepare the filling. Keep the oven on.
Step 4: Make the Lemon Filling
In a medium bowl, whisk together the eggs and granulated sugar until well combined. Add the gluten-free flour, lemon juice, lemon zest, and salt. Whisk until the mixture is smooth and no lumps remain.
Step 5: Pour and Bake
Pour the lemon filling over the warm crust, spreading it evenly to the edges. Return the pan to the oven and bake for 22-25 minutes, or until the filling is set and no longer jiggles in the center.
Step 6: Cool Completely
Remove the pan from the oven and let the bars cool completely at room temperature. For best results, refrigerate for at least 2 hours before cutting. This helps the bars set properly and makes them easier to slice.
Step 7: Cut and Serve
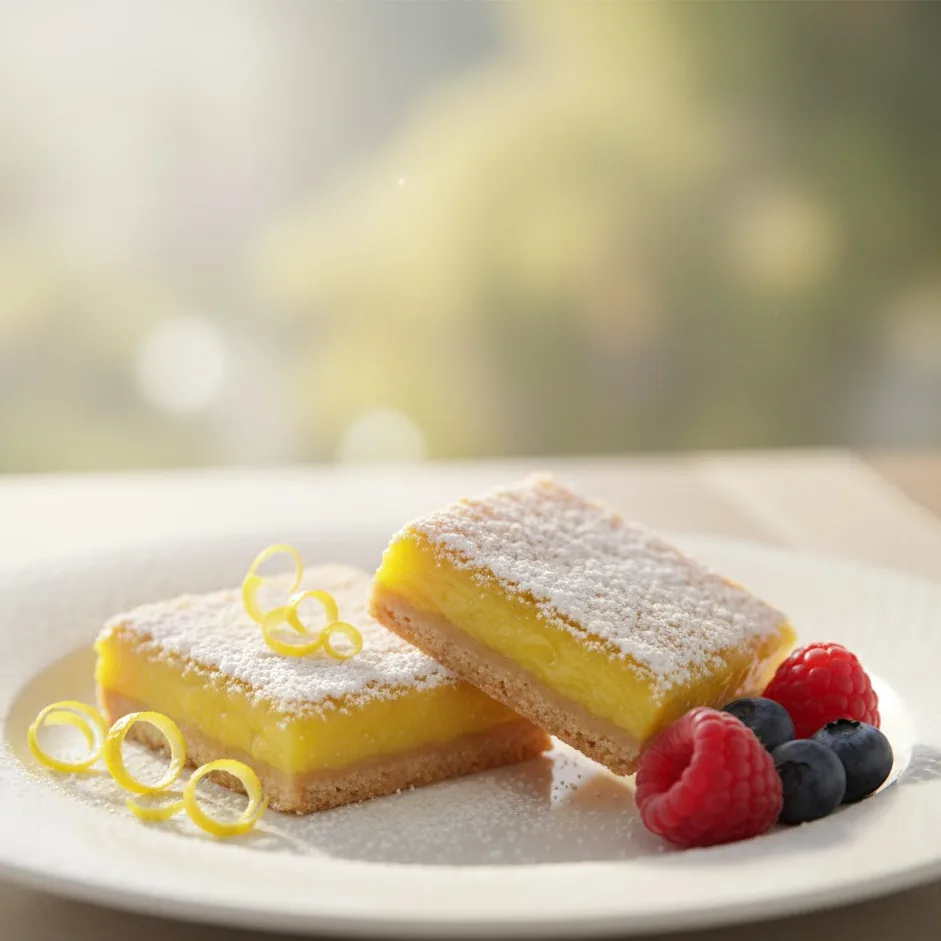
Use the parchment paper overhang to lift the bars out of the pan. Cut into 16 squares using a sharp knife (wipe the knife clean between cuts for neat edges). Dust generously with powdered sugar before serving.
Did you make this gluten free lemon bars recipe? Share your experience in the comments below! And if you loved it, don’t forget to give it a rating—your feedback helps other readers (and Google!) know this recipe is worth trying.
Tips, Variations & Storage
Substitutions & Variations:
- Dairy-Free Option: Use vegan butter or coconut oil in place of regular butter for both the crust and filling.
- Extra Tangy: Add an extra tablespoon of lemon juice and increase the zest to 2 tablespoons.
- Lime Bars: Swap lemon juice and zest for lime to make gluten-free lime bars instead.
- Gluten-Free Flour: Make sure your flour blend contains xanthan gum. If it doesn’t, add ½ teaspoon to the crust and ¼ teaspoon to the filling.
Make-Ahead Advice:
You can prepare the crust up to 1 day ahead. Bake it, let it cool, cover tightly and refrigerate. Add the filling and bake when you’re ready.
Storage Tips:
Store leftover gluten free lemon bars in an airtight container in the refrigerator for up to 5 days. You can also freeze them for up to 3 months—just wrap individual bars in plastic wrap, then place in a freezer bag. Thaw in the fridge overnight before serving.
Serving Ideas:
These bars are delicious on their own, but you can serve them with a dollop of whipped cream, fresh berries, or a Chocolate Banana Ice Cream for an extra-special dessert.
FAQs About gluten free lemon bars
Can I use regular all-purpose flour instead of gluten-free flour?
Yes, if you’re not following a gluten-free diet, you can substitute regular all-purpose flour in equal amounts. The texture will be slightly different but still delicious.
Why is my lemon filling runny?
Make sure you bake the filling long enough it should be set and not jiggly in the center. Also, allow the bars to cool completely and chill in the fridge before cutting, as this helps them firm up.
Can I use bottled lemon juice?
Fresh lemon juice is highly recommended for the best flavor. Bottled lemon juice often has a slightly bitter or artificial taste that can affect the final result.
Do I need to use a gluten-free flour blend with xanthan gum?
Yes, xanthan gum helps bind the ingredients together in gluten-free baking. If your flour blend doesn’t include it, add ½ teaspoon to the crust mixture and ¼ teaspoon to the filling.
How do I know when the bars are done baking?
The filling should be set and slightly golden on top. It may still have a slight jiggle in the very center, but it will firm up as it cools.
Nutrition Facts
Per serving (1 bar):
Calories: 185
Protein: 2g
Carbs: 28g
Fat: 8g
Fiber: 0.5g
Sugar: 20g
(Nutrition information is approximate and based on 16 servings.)
Conclusion
These gluten free lemon bars are everything you want in a dessert—bright, tangy, sweet, and incredibly satisfying. They’re easy enough for beginners but impressive enough to serve at any gathering. Give this recipe a try, and you’ll have a new go-to dessert that everyone will ask you to make again and again.
If you enjoyed this gluten free lemon bars recipe, please share it with friends or save it on Pinterest for later. Every share helps me keep creating simple and delicious recipes for you.
Print
Easy Gluten Free Lemon Bars Recipe | Tangy & Delicious
These gluten free lemon bars feature a buttery, melt-in-your-mouth crust topped with a tangy, sweet lemon filling that’s perfectly balanced. Made with simple ingredients and a gluten-free flour blend, this recipe delivers classic lemon bar flavor and texture without any gluten. The bars are easy to make, require no special techniques, and are perfect for potlucks, holidays, or any time you’re craving a bright, citrusy dessert. Fresh lemon juice and zest give these bars an authentic, refreshing taste that everyone will love whether they follow a gluten-free diet or not.
- Total Time: 60 minutes (plus 2 hours cooling/chilling time)
- Yield: 16 bars
Ingredients
For the Crust:
- 1 ½ cups gluten-free all-purpose flour blend (with xanthan gum)
- ½ cup powdered sugar
- ¼ teaspoon salt
- ¾ cup unsalted butter, cold and cubed
For the Lemon Filling:
- 4 large eggs
- 1 ½ cups granulated sugar
- ⅓ cup gluten-free all-purpose flour blend
- ½ cup fresh lemon juice (about 3–4 lemons)
- 1 tablespoon lemon zest
- ¼ teaspoon salt
For Topping:
- Powdered sugar for dusting
Instructions
- Preheat your oven to 350°F (175°C). Line a 9×9-inch baking pan with parchment paper, leaving some overhang on the sides. Lightly grease the parchment.
- In a large bowl, whisk together 1 ½ cups gluten-free flour, ½ cup powdered sugar, and ¼ teaspoon salt. Add cold cubed butter and work it into the flour mixture until it resembles coarse crumbs. Press evenly into the prepared pan.
- Bake the crust for 18-20 minutes until lightly golden around the edges. Remove and let cool slightly. Keep oven on.
- In a medium bowl, whisk together eggs and granulated sugar until combined. Add ⅓ cup gluten-free flour, lemon juice, lemon zest, and ¼ teaspoon salt. Whisk until smooth.
- Pour the lemon filling over the warm crust, spreading to the edges. Bake for 22-25 minutes until the filling is set and no longer jiggles in the center.
- Cool completely at room temperature, then refrigerate for at least 2 hours before cutting.
- Use the parchment overhang to lift bars from pan. Cut into 16 squares and dust with powdered sugar before serving.
Notes
- Gluten-Free Flour: Use a gluten-free all-purpose flour blend that contains xanthan gum (such as Bob’s Red Mill 1-to-1 Baking Flour or King Arthur Measure for Measure). If your blend doesn’t include xanthan gum, add ½ teaspoon to the crust and ¼ teaspoon to the filling.
- Fresh Lemon Juice: Always use fresh lemon juice for the best flavor. Bottled lemon juice has a different taste and can make the bars taste artificial.
- Cooling Time: Cooling completely and refrigerating is essential for clean cuts. The filling needs time to set properly.
- Clean Cuts: Wipe your knife clean between each cut for neat, professional-looking bars.
- Storage: Store in an airtight container in the refrigerator for up to 5 days. Can be frozen for up to 3 months.
- Make Ahead: The crust can be baked 1 day ahead. Cover and refrigerate, then add filling and bake when ready.
- Prep Time: 15 minutes
- Cook Time: 45 minutes
- Category: Dessert
- Method: Baking
- Cuisine: American
- Diet: Gluten Free